


ImageTeaching and learning sequenceAdditional tasks and activities
Sample Task Sequence 8: Elderly Māori man, 1870s–1880s
Digital resource from the Te Papa Collection
Image: Elderly Māori man, 1870s–1880s
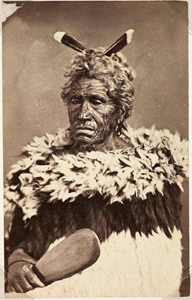
Copyright: Reproduced courtesy of the Museum of New Zealand Te Papa Tongarewa
Creator: Unidentified
Identifiers: Museum of New Zealand Te Papa Tongarewa number O.025641/1. TLF resource R4717
Source: Museum of New Zealand Te Papa Tongarewa, http://www.tepapa.govt.nz
Students should be able to:
7.1 communicate about future plans;
7.2 offer and respond to advice, warnings, and suggestions;
7.3 express and respond to approval and disapproval, agreement and disagreement;
8.1 communicate about certainty and uncertainty, possibility and probability;
8.2 develop an argument or point of view, with reasons.
Links to other learning areas
The social sciences, especially history
Te reo Māori text
Ko te karanga, ko te maunga, ko te awa, ko te waka.
Āe, ko te mana o te tangata.
Āe, ko te mana o te tā moko.
He rangatira, he upoko ariki.
Tūī, tūī, tuia mai
Te huia
Ngā rau hoki, o tēnā manu, o tēnā manu.
Kaha tau ana hoki te mere.
Tihei mauri ora.
Ko wai tēnei rangatira? Ko wai tēnei rangatira? Nōu? Nōku? Ko tēnei te karanga ki a tātau. Nōna te tū, nōna te karanga. Ko ia e tū mai ana i tērā rau tau, e wero mai ana i a tātou kia mau i ngā whakaaro o rātou mā. Ahakoa ngā tumeke, ngā raru, ngā hingahingatanga e whakapōuri ana i te hunga Māori o ēra wā, ka kitea te karanga o tana pepeha, ngā pepeha o ngā maunga hoki. “Mate ana he tētēkura, ara mai ana he tētēkura.”
Three-level guide
There are two versions of the three-level guide below, one in te reo Māori and one in English. Students who are working at levels 7–8 should use the te reo Māori version. The English version that follows is provided to increase the flexibility of this task, for example, it enables its use with students whose proficiency level is a little lower than level 7. (Note that in order to maintain an appropriate level of discussion, the whakataukī in the level three statements remain in te reo Māori.)
Ngā Ara Taumata e Toru (Three-level Guide)It is important for you to work through this guide by yourself first. When you have finished, you will discuss your answers with other students. Taumata tuatahi Tick the statements that are true. Put a cross by the statements that are not true. Be ready to support your answer with evidence from the image or the text. • Kei te mau i ngā kākahu tūturu a te Māori, te rangatira nei. • He kura tūī kei tōna upoko. • He tā moko rangatira tōna. • He nui tōna koa. • Kei te ora tonu ia. Taumata tuarua Tick the statements you think the writer wants you to understand. Put a cross by the other statements. Be ready to explain your reasons by giving clues from the text. • Kei te mōhiotia ko wai te rangatira nei. • Nā te tā moko ka mōhio he upoko ariki ia. • He nui ngā raruraru o te Māori o tērā atu rau tau. • Nō tō rohe te rangatira nei. Taumata tuatoru Tick the statements you think the writer would agree with. Put a cross by the other statements. Be ready to explain the reasons for your decisions. • Kei te mokemoke te rangatira nei ki tōna maunga. • Ngaro ana te mana, ngaro ana te tangata. • Ara mai ana he tētēkura. |
Ngā Ara Taumata e Toru (Three-level Guide)It is important for you to work through this guide by yourself first. When you have finished, you will discuss your answers with other students. Taumata tuatahi Tick the statements that are true. Put a cross by the statements that are not true. Be ready to support your answers with evidence from the image or the text. • This rangatira is wearing traditional Māori clothing. • He has a tūī feather in his hair. • He has the moko of a rangatira. • He looks very happy. • He is still living today. Taumata tuarua Tick the statements you think the writer wants you to understand. Put a cross by the other statements. Be ready to explain your reasons by giving evidence from the text. • This rangatira’s identity is known. • From his moko, we know he is a high-ranking chief. • In that century, Māori were experiencing many problems. • This rangatira is from your district. Taumata tuatoru Tick the statements you think the writer would agree with. Put a cross by the other statements. Be ready to explain the reasons for your decisions. • This rangatira is feeling alienated from his roots. • Ngaro ana te mana, ngaro ana te tangata. • Ara mai ana he tētēkura. |
Teaching and learning sequence
When appropriate, the teacher shares the intended learning outcomes with the students and negotiates success criteria with them. The teacher and students discuss these throughout the teaching and learning sequence.
1. Viewing of image
The students view the image: Elderly Māori man, 1870s–1880s.
2. Pre-reading discussion
Before beginning the pre-reading discussion, it would be helpful for students and teachers together to compile a list of phrases that can be used for making suggestions, expressing opinions, and politely disagreeing, as the students will need these to take part effectively in the discussion to follow. The students then work in pairs or groups of four, discussing the photograph and sharing their opinions about it. This discussion should be in te reo Māori only. The teacher circulates, giving encouragement, helping with vocabulary, and offering suggestions where necessary. The teacher records key new te reo Māori vocabulary to create a class word bank.
3. Reading te reo Māori text
The students read the text silently, but are free to discuss any areas of difficulty in their pairs or small groups.
4. Teacher clarification
After the reading, the teacher draws attention to new vocabulary and grammar and clarifies any remaining uncertainties.
5. Three-level guide
Each student is given a copy of the three-level guide and works through it independently, ticking the true statements and putting a cross beside the false statements at each of the three levels. Before the students begin, it is important to point out that the accuracy or otherwise of the Level 1 statements is clear from the image or from a direct statement in the text. The Level 2 statements require the students to read between the lines and draw conclusions about the writer’s intended message. The Level 3 statements require the students to interpret thought-provoking statements and select or reject these statements according to those they think the writer would agree with. At each level, the students must be ready to cite information from the photograph or the text that leads them to their decision.
6. Group discussion and mind mapping
When the students have made their own decisions and marked their papers accordingly, they work in groups of four, taking turns to explain their response to each statement and give their individual reasons for the conclusions they reached. As they work, they share responsibility for making a group mind map of the main ideas emerging from the discussion. This mind map is kept safe, as it will be used later, with additional information, in the presentation.
7. Inquiry
The groups of students discuss what they know of the time in history when this photograph was taken (1870s–1880s). They then frame a written question relating to what the social, educational, and cultural issues were for Māori at that time, for example:
- What roles did Māori have in the changing society?
- What were the mounting problems?
- What future was expected for Māori?
- What was the status of te reo Māori in schools at the time?
Each student makes an inquiry plan that identifies how they will seek answers to their question. This might be through reading (using the library or Internet), museum visits, or interviewing whānau members or kaumātua. While the teacher provides support and oversight, the students undertake at least part of their inquiries for homework. They make written notes in which they record keywords and simple sentences in te reo Māori. They bring these notes to school to contribute to the next group discussion.
8. Integration of information from the inquiry and group mind maps
Each group of students will make a poster. (The students may need to be reminded that words on a poster need to be kept to a minimum and be large enough to catch the eye, and that colour and graphics will help convey the message and encourage viewers to read it.)
The poster will be divided into two sections, one entitled “Mate ana he tētēkura” and the other “Ara mai ana he tētēkura”. The “Mate ana he tētēkura” portion will incorporate information from the group’s original mind map, as well as findings from the students’ individual inquiries. The students will need to share, discuss, and synthesise their information, deciding as a group how their findings relate to the heading “Mate ana he tētēkura” and recording key points on their poster under this heading. They then discuss the educational, political, and employment opportunities for young Māori today, and record key points under “Ara mai ana he tētēkura”.
As the students work, the teacher circulates, encouraging the students to kōrero Māori and offering suggestions and feedback where needed.
9. Presentation
Each group of students presents their poster to the class. As every student is required to take part in presenting the information, they must decide beforehand the order of speakers and the sections of the information that they will each be responsible for. After the presentations, the audience provides feedback and the posters are displayed on the classroom walls for further reference.
10. Reflection
The students have 10–15 minutes to reflect individually on what they have learned from this cycle of learning. They briefly record the following information in te reo Māori:
- Tuhia ngā kupu hou. (New vocabulary.)
- Tuhia tētahi whakaaro hou kua akongia e koe. (One new thing you learned from your own inquiry.)
- Tuhia tētahi whakaaro hou i puta mai i tētahi hoa. (One new thing you learned from another student.)
- Tuhia ōu whakaaro, ōu manako mō ngā tau e haere mai ana. (Your expectations and aspirations for the future.)
Further pair and class reflection could focus on new sentence patterns learned, individual confidence and fluency gained, and goals for the future.
Additional tasks and activities
Depending on their students’ needs and interests, teachers may like to select from some of the following tasks and activities:
- Inquire into and write about the events of the latter part of the nineteenth century.
- Interview kaumātua about social and political changes for Māori during their lifetime.
- Collect information over time about Māori education, politics, and economics. Use this as a basis for discussion and group or individual writing.
- Explore educational and career opportunities for young Māori who are proficient in te reo Māori.
- Collect whakataukī and a range of personal perspectives on what messages these have for today’s rangatahi.
- Select other whakataukī for further discussion and poster presentations.