ImageTeaching and learning sequenceAdditional tasks and activities
Sample Task Sequence 5: Kete kiekie
Digital resource from the Te Papa Collection
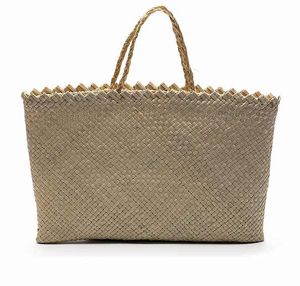
Image: Kete kiekie, 1964


Copyright: Reproduced courtesy of the Museum of New Zealand Te Papa Tongarewa
Creator: Reihana-Mete, Rangimāhora, artist, 1964
Identifiers: Museum of New Zealand Te Papa Tongarewa number ME011257. TLF resource R3686
Source: Museum of New Zealand Te Papa Tongarewa, http://www.tepapa.govt.nz
Students should be able to:
5.4 describe, compare, and contrast people, places, and things;
6.1 give and follow instructions.
Links to other learning areas
Technology, the arts (visual arts), science, mathematics (patterns).
Te reo Māori text
He kete kiekie tēnei, i oti i te tau 1964. Ko Rangimahora Reihana-Mete te kairaranga, nō Ngāti Raukawa, nō Ngāti Rangiwewehi. Tēnā koe, e Kui, nāu i whāriki mai hei mīharo ki te ao Māori. He maha ngā ingoa e pā ana ki te kete. Tuatahi, ka tirohia te ingoa, ka mōhio ko tēhea papanga kei te mahia, pērā i te kete kiekie, kete harakeke, kete pīngao, kete tīkōuka. Tuarua, mā te ingoa ka mōhio hoki he aha ngā mea kei te kawea, pērā i te kete kūmara, kete pāhao, kete pūkirikiri, kete kahurangi. Te nuinga o ngā kete ka mahia i te papanga harakeke. Engari anō, ngā kete tino ātaahua, ngā kete tino motuhake hoki, ka mahia i te papanga kiekie, pīngao rānei. Engari anō, nā te iti haere o te pīngao me te kiekie ka taea e ngā tohunga raranga te mahi kete ātaahua mā te papanga harakeke.
Statements: Kei te tika/Kāore i te tika
1. I raranga te kete nei ki te harakeke.
2. He maha ngā kete ka raranga ki te harakeke.
3. Ka raranga ngā kete kūmara ki te pīngao.
4. Ka kawea te pāhao i roto i te kete kahurangi.
5. He tino ātaahua ētahi o ngā kete ka raranga ki te harakeke.
Teaching and learning sequence
When appropriate, the teacher shares the intended learning outcomes with the students and negotiates success criteria with them. The teacher and students discuss these throughout the teaching and learning sequence.
1. Viewing of image
The students view the image: Kete Kiekie, 1964.
2. Pre-reading discussion
The students work in pairs or groups of four, discussing the image and sharing any information they know about kete and the materials from which they are woven. The teacher records key te reo Māori vocabulary to create a class word bank.
3. Reading te reo Māori text
The students read the text silently, but are free to discuss any areas of difficulty in their pairs or small groups. They may need to consult a dictionary for some technical vocabulary that cannot be guessed from context.
4. Teacher clarification
After the reading, the teacher draws attention to new vocabulary and grammar and clarifies any remaining uncertainties.
5. Pair interactive task
In pairs, the students take turns to read the Kei te tika/Kāore i te tika statements. The listener says “Kei te tika” if the sentence is correct or “Kāore i te tika” if it is wrong. If it is wrong, the same student must correct the error. For example, Statement 3 is “I raranga te kete nei i te harakeke”. This statement is wrong, so the student says “Kei te hē” and corrects the statement. The correction may be made in any of the following ways:
- by following the sentence pattern of the statement, but with the error corrected (for example, “I raranga te kete nei i te kiekie”);
- by using an appropriate sentence from the text (for example, “He kete kiekie tēnei”); or
- in the student’s own words (for example, “Nā te ingoa ka mōhio kua raranga te kete nei i te harakeke”).
When the students have completed the list of statements, they make up some Kei te tika/Kāore i te tika statements of their own for their partner to respond to. The ideas for these could come from their own knowledge and/or from the text.
6. Group mind mapping
Working in groups of four, the students discuss the text, clarifying any areas of uncertainty. As they talk, they collaboratively make a mind map about kete. The teacher circulates, helping with vocabulary and encouraging the students to kōrero Māori. The mind map is kept safe, as it will be used later, with additional information, in the presentation.
7. Inquiry
Facilitated by the teacher, the students discuss what other information they want to find out about kete and the plants from which they are made. Topics for the inquiry could include:
- The ways kete are used
- Instructions for weaving different types of kete
- Different weaving patterns seen on kete
- The properties and appearance of various weaving materials and how they compare
- The advantages and disadvantages of particular materials for particular types of kete
- The different uses for different parts of the flax bush
- How the various materials are prepared for use in weaving
- Comparisons between kete Māori and kete from the Pacific and Asia.
The groups form written questions on which to focus their inquiries and then each student makes an inquiry plan that identifies how they will seek answers to their questions. This might be through reading (using the library or Internet), museum visits, or interviewing whānau members or kaumātua who have knowledge and experince of raranga kete. While the teacher provides support and oversight, the students undertake at least part of their inquiries for homework. They make written notes in which they record keywords and simple sentences in te reo Māori, and they bring these notes to school.
8. Addition of information to group mind maps
The class discusses the criteria for an effective mind map. Then, in their groups, the students pool the results of their inquiries and discuss how their findings can be incorporated into their group mind maps. This involves group discussion and the synthesis, prioritisation, and organisation of information. As the students work, the teacher circulates, helping with vocabulary and encouraging the students to kōrero Māori.
9. Presentation
The teacher selects a method of presentation, perhaps choosing from one of the five suggestions in this resource.
10. Reflection
The students have 10 minutes to reflect individually on what they have learned from this cycle of learning. They briefly record the following information in te reo Māori:
• Tuhia ngā kupu hou. (List the new vocabulary you learned.)
• Tuhia tētahi whakaaro hou i akongia e koe. (Write one new thing you learned from your own inquiry.)
• Tuhia tētahi whakaaro hou i puta mai i tētahi hoa. (Write one new thing you learned from another student.)
The students follow this with oral class reflection on the new grammar they learned and used during this sequence of teaching and learning.
Additional tasks and activities
Depending on their students’ needs and interests, teachers may like to select from some of the following tasks and activities:
- View and discuss the other three types of kete in this resource (the images of the Kete pūkirikiri c. 1904; Kete tīkōuka c. 1964; and Kete, open-weave, 1940).
- Research and dramatise traditional stories about kete (for example, Tāne’s gift of the three baskets of knowledge) with all dialogue in te reo Māori.
- Study tikanga relating to collecting and working with weaving materials.
- Visit and take part in raranga workshops.
- Write instructions for weaving kete.
- Study raranga patterns and explore reasons why certain types of pattern are prevalent in weaving.
- Create new weaving patterns. (If authentic materials are not available, the students could use strips of plastic strapping or strong coloured paper.)


